The short cut is:
Ctrl+shift+b - to hear the entire Document
Ctrl+shift+v - to hear the page
Ctrl+shift+c - to resume
Ctrl+shift+e - to stop
Open any PDF File and test.... unbelievable.
Now even ebooks can be listened too by creating them in Adobe Reader 7.0
Select
View----->Read Out Loud------>Activate Readout Loud
Search This Blog
Popular Posts
-
FarmVille Trees Most profitable FarmVille trees in order: 1. Acai Tree Cost: 27 FarmVille Cash | Income: 158 | Harvest in: 2 days |...
-
Here is a simple trick to find out your Gmail account creation date.If you have deleted the first email sent by the Gmail team then there is...
-
These are the best earning FarmVille crops in order according to coin income: 1. Peas Cost: 190 Sell: 381 Harvest Time: 23 hours (1...
Friday, September 23, 2011
You can listen to any PDF instead of reading with Adobe Reader 7.0 or 6.0
Wednesday, September 21, 2011
Restore Default Desktop Icons
You can restore the all windows default desktop icons, if you accidentally deleted them from your computer desktop.
List of windows default icons.
- My Computer
- Internet Explorer
- My Documents
- My Network Places
- Recycle Bin
- Go to Start Button and open Run
- Type the given command to open windows Desktop items dialog box.
Control desk.cpl,,@Web - Click OK
- Now Select Items that you want on your Desktop
- Click Ok
Monday, September 19, 2011
Is your computer part of a BotNet?
What is BotNet?
A BotNet, also known as a zombie army, is a computer connected to the Internet that has been set up to forward transmissions (including spam or viruses) to other computers on the Internet, without the knowledge of the computer owner.
You can check to see if your computer has been detected in a honeynet at
www.botnetchecker.com
Sunday, September 18, 2011
Some useful Facebook Keyboard Shortcuts
Facebook Shortcut Keys For Firefox And Internet Explorer
Just while using Facebook.com use these Shortcut Keys For Facebook as shown in the table
Shift+Alt+0 = facebook help center
Shift+Alt+1 = facebook homepage
Shift+Alt+2 = your facebook profile page
Shift+Alt+3 = friend request
Shift+Alt+4 = messages
Shift+Alt+5 = notification
Shift+Alt+6 = account page
Shift+Alt+7 = privacy setting
Shift+Alt+8 = facebook's page on facebook
Shift+Alt+9 = facebook terms of use
Shift+Alt+? = enable search
Shift+Alt+m = compose a new message
Try these from today
have a nice day guys
Dialog box keyboard commands
TAB: Move to the next control in the dialog box
SHIFT+TAB: Move to the previous control in the dialog box
SPACEBAR: If the current control is a button, this clicks the button. If the current control is a check box, this toggles the check box. If the current control is an option, this selects the option.
ENTER: Equivalent to clicking the selected button (the button with the outline)
ESC: Equivalent to clicking the Cancel button
ALT+underlined letter in dialog box item: Move to the corresponding item
Friday, September 16, 2011
Microsoft Natural Keyboard keys
Windows Logo: Start menu
Windows Logo+R: Run dialog box
Windows Logo+M: Minimize all
SHIFT+Windows Logo+M: Undo minimize all
Windows Logo+F1: Help
Windows Logo+E: Windows Explorer
Windows Logo+F: Find files or folders
Windows Logo+D: Minimizes all open windows and displays the desktop
CTRL+Windows Logo+F: Find computer
CTRL+Windows Logo+TAB: Moves focus from Start, to the Quick Launch toolbar, to the system tray (use RIGHT ARROW or LEFT ARROW to move focus to items on the Quick Launch toolbar and the system tray)
Windows Logo+TAB: Cycle through taskbar buttons
Windows Logo+Break: System Properties dialog box
Application key: Displays a shortcut menu for the selected item
Thursday, September 15, 2011
Windows program key combinations
CTRL+C: Copy
CTRL+X: Cut
CTRL+V: Paste
CTRL+Z: Undo
CTRL+B: Bold
CTRL+U: Underline
CTRL+I: Italic
CTRL+X: Cut
CTRL+V: Paste
CTRL+Z: Undo
CTRL+B: Bold
CTRL+U: Underline
CTRL+I: Italic
Windows system key combinations
F1: Help
CTRL+ESC: Open Start menu
ALT+TAB: Switch between open programs
ALT+F4: Quit program
SHIFT+DELETE: Delete item permanently
Windows Logo+L: Lock the computer (without using CTRL+ALT+DELETE)
CTRL+ESC: Open Start menu
ALT+TAB: Switch between open programs
ALT+F4: Quit program
SHIFT+DELETE: Delete item permanently
Windows Logo+L: Lock the computer (without using CTRL+ALT+DELETE)
Tuesday, September 13, 2011
short cuts for MS Word, Excel
These Symbols can be used in MS Word, Excel,etc.
For © : Alt+0169
For ® : Alt+0174
For ™ : Alt+0153
For › : Alt+0155
For † : Alt+0134
For ø : Alt+0248
For ¤ : Alt+0164
For « : Alt+0171
For ° : Alt+0176
For ± : Alt+0177
For ² : Alt+0178
For ³ : Alt+0179
For µ : Alt+0181
For ¶ : Alt+0182
For ¹ : Alt+0185
For » : Alt+0187
For ¼ : Alt+0188
For ½ : Alt+0189
For ¾ : Alt+0190
For Å : Alt+0197
For × : Alt+0215
For Ø : Alt+0216
For Þ : Alt+0222
For ß : Alt+0223
For ☺: Alt+1
Wednesday, September 7, 2011
WINDOWS XP HIDDEN APPLICATIONS

To run any of these apps go to Start
> Run and type the executable name (ie charmap).
WINDOWS XP HIDDEN APPS--
=========================================
1) Character Map = charmap.exe (very useful for finding unusual characters)
2) Disk Cleanup = cleanmgr.exe
3) Clipboard Viewer = clipbrd.exe (views contents of Windows clipboard)
4) Dr Watson = drwtsn32.exe (Troubleshooting tool)
5) DirectX diagnosis = dxdiag.exe (Diagnose & test DirectX, video & sound cards)
6) Private character editor = eudcedit.exe (allows creation or modification of characters)
7) IExpress Wizard = iexpress.exe (Create self-extracting / self-installing package)
8- Microsoft Synchronization Manager = mobsync.exe (appears to allow synchronization of files on the network for when working offline. Apparently undocumented).
9) Windows Media Player 5.1 = mplay32.exe (Retro version of Media Player, very basic).
10) ODBC Data Source Administrator = odbcad32.exe (something to do with databases)
11) Object Packager = packager.exe (to do with packaging objects for insertion in files, appears to have comprehensive help files).
12) System Monitor = perfmon.exe (very useful, highly configurable tool, tells you everything you ever wanted to know about any aspect of PC performance, for uber-geeks only )
13) Program Manager = progman.exe (Legacy Windows 3.x desktop shell).
14) Remote Access phone book = rasphone.exe (documentation is virtually non-existant).
15) Registry Editor = regedt32.exe [also regedit.exe] (for hacking the Windows Registry).
16) Network shared folder wizard = shrpubw.exe (creates shared folders on network).
17) File siganture verification tool = sigverif.exe
1 Volume Contro = sndvol32.exe (I've included this for those people that lose it from the System Notification area).
19) System Configuration Editor = sysedit.exe (modify System.ini & Win.ini just like in Win98! ).
20) Syskey = syskey.exe (Secures XP Account Details )
Thursday, September 1, 2011
How To Display The Current Date And Time In A PowerPoint Presentation
Add the Current Time and Date to a PowerPoint Slide
1. Open your PowerPoint document and got to the View tab on the Ribbon. Choose the Normal view. Select the first slide of the slideshow.
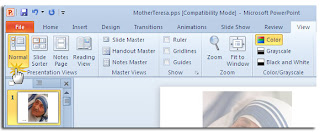
2. Click on the Insert tab and go to the Text group. Click on the little Date and Time icon which gives you options to insert the current date and time into the PowerPoint document

3. Clicking on the Date and Time icon opens up the Header and Footer dialog box. Using the two tabs (as in the screenshot) we can add the date and time values to our main slides as well as the Notes and Handouts we usually print out and give to the audience as reference material.
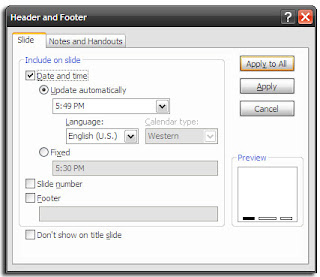
4. The next few steps are pretty simple – choose the date and time format from the dropdown. Selecting a Fixed time acts as a marker that lets you know when the slide was created. It is obviously constant. The Update automatically selection displays a dynamic time that takes the current time from the system clock. The options are the same for the Notes and Handouts tab. (Preferably, don’t show the date and time on the title slide).
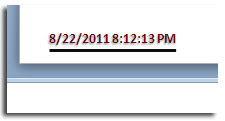
Remember: Each time you open or print the presentation, PowerPoint will update the time. PowerPoint does not continuously update automatically but only at the start of the slide show.
5. Select Apply to All and you are done.
Add the Current Time and Date According to the Language
1. Choose File – Options – Language. The Options dialog gives you a lineup of additional languages to edit your document.
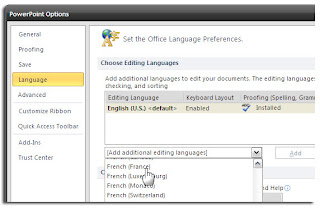
2. Expand the dropdown for Add additional editing languages and select the language(s) of your choice which you want to use for the date and time. Click on Add.
3. Press OK and exit the PowerPoint file.
4. Reopen the presentation and position your cursor where you wish to insert the date. Take the usual route of selecting the Insert tab and then clicking on the Date and Time button.
5. If you are using something like a text box to insert your date and time, you will get a dialog box like this:
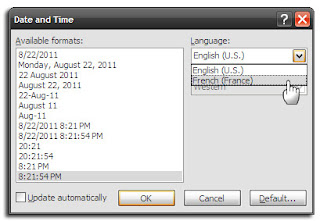
If you are adding the date and time as a footer, then the usual box appears. In both cases, select the date and time format, and pick the language from the dropdown. After the Ok, the date and time is entered in the language of the country chosen.
Using the date and time with your PowerPoint slides is a simple final step to follow before you give or distribute a presentation.
Subscribe to:
Comments (Atom)

